Guiding you to growth with Dynamics 365 Sales
With over 25 years of experience supporting CRM solutions, we help companies simplify processes, increase seller productivity and gain actionable insights from their data.
Our consultative approach focuses on adoption, change management, and utilising Dynamics 365 Sales to enhance customer interactions and drive growth.
How Dynamics 365 Sales Benefits You
Simplify your processes with guided and automated workflows to efficiently manage leads and opportunities through your selling cycle.
Use predictive analytics, embedded Power BI visuals, and AI-powered recommendations to gain data-powered insights that help sellers win.
Centralise your relationship data to gain insights for tailored outreach and personalised experiences.

Streamline Processes
Simplify your processes with guided and automated workflows to efficiently manage leads and opportunities through your selling cycle.
Increased productivity
Reduce repetitive tasks to minimise data entry and maximise selling time with AI-powered Copilot features and integration with Outlook and Teams.
Winning Insights
Use predictive analytics, embedded Power BI visuals, and AI-powered recommendations to gain data-powered insights that help sellers win.
Grow relationships
Centralise your relationship data to gain insights for tailored outreach and personalised experiences.
Enhanced collaboration
Native integration with Microsoft Teams and conversation intelligence provides coaching for sellers and improves teamwork. Get a deeper understanding of customer needs from transcribed call summaries and save time with automatically generated follow-ups.
How we Partner with You
We use an agile methodology to deploy and tailor Dynamics 365 Sales. If you already use the system, we’ll collaborate to increase its impact.
With hundreds of successful projects under our belt, our team has the expertise to help you unlock the full potential of Dynamics and the Microsoft Power Platform. Trust ServerSys to provide you with a partnership and customer experience like no other.
Lead and Opportunity Management
Predictive Scoring
LinkedIn Sales Navigator Integration
Extendable with Power Automate
Demonstrating Dynamics 365 Sales
Video Transcript
Dynamics 365 Sales empowers sellers to help teams accelerate revenue and increase scale. This includes AI assistance, automation and insights to improve focus and productivity.
Let’s start by looking at how it works in Outlook. Using the Copilot digital assistance, salespeople can perform various CRM tasks in the familiar Outlook interface without juggling between applications.
Here, we’ve received a new email. Copilot has identified the sender as a contact that doesn’t exist in Dynamics, so it nudges us to create this record in CRM. Contact information including the job title is automatically extracted from the email. We can populate any additional field data and click save to add this as a new contact in Dynamics. Copilot also offers an email summary for detailed messages. This can save time by quickly conveying key points helping you identify the next steps. These email summaries can be copied and saved to the relevant record in Dynamics or you can save the complete email. In both cases, the message details will be added to the Dynamics 365 record timeline as we’ll see in a moment.
We’ve now moved to another inbound email, this time from an existing customer. The information in their message affects a deal that we’re working on. Copilot automatically finds the appropriate Dynamics contact and other related records including our active sales opportunity. The email says the potential order will now be for an increased value but the expected completion data has been pushed out so we need to update this information in CRM. To simplify data entry and minimise the time spent switching between applications, with Copilot you can access your CRM deals within Outlook and make routine changes.
Here, for example, we’ll adjust the forecasted value and the estimated close date. Copilot can be configured to display other related CRM records alongside your Outlook emails. In this example, we can also navigate to the related account to view or update information in Outlook or follow the link to open this record in Dynamics.
By working alongside Dynamics 365 and Outlook, Copilot also helps save time when replying to emails. Going back to the previous message, I want to respond to this sales enquiry. Copilot will now prepare a draft response using the context it’s gained from the email. Looking at this first draft, we’ll ask it to make a change. This could include varying the message length if needed, but for this response I’ll just adjust the tone. Copilot recognises that a call is proposed and because it can see my calendar availability, I’m able to select a couple of time slots. Copilot now redrafts the response which can be copied into the email body where changes and further personalisation can be made. Upon sending the message, the email is automatically tracked in Dynamics 365.
We’ve seen how salespeople can easily access and update CRM information in Outlook, let’s now switch to the main Dynamics 365 Sales interface.
Because Dynamics and Outlook run on the same database, it means there’s always a centralised view of each relationship. In Dynamics, contact records provide a single reference point about each person. The Copilot AI assistant is present here too, providing a summary of record highlights which gives us a head start, especially if we’re not familiar with this relationship.
Below the highlights, the timeline provides a list of interactions including the tracked email we saw earlier. To quickly find timeline entries, you can run a keyword search or apply various filters such as activity type and status reason. Dynamics 365 Sales works alongside other Dynamics apps, so interactions from these can be made visible to sellers subject to security role permissions. For instance, here we can see case communications in the timeline from the Customer Service Workspace. Dynamics Marketing interactions can also be accessed to improve transparency between sales and marketing teams.
Here, we can see recent marketing emails sent to this person and understand which ones they’ve opened. Each personalised marketing message can be viewed from the timeline giving sellers clarity and potential conversation starters.
Dynamics also integrates with LinkedIn Sales Navigator. This includes enabling sales teams to surface LinkedIn insights about a contact, make connection requests and send LinkedIn messages within Dynamics, which again minimises the interruption of jumping between interfaces. From the contact record you can quickly access other related records including scheduled activities.
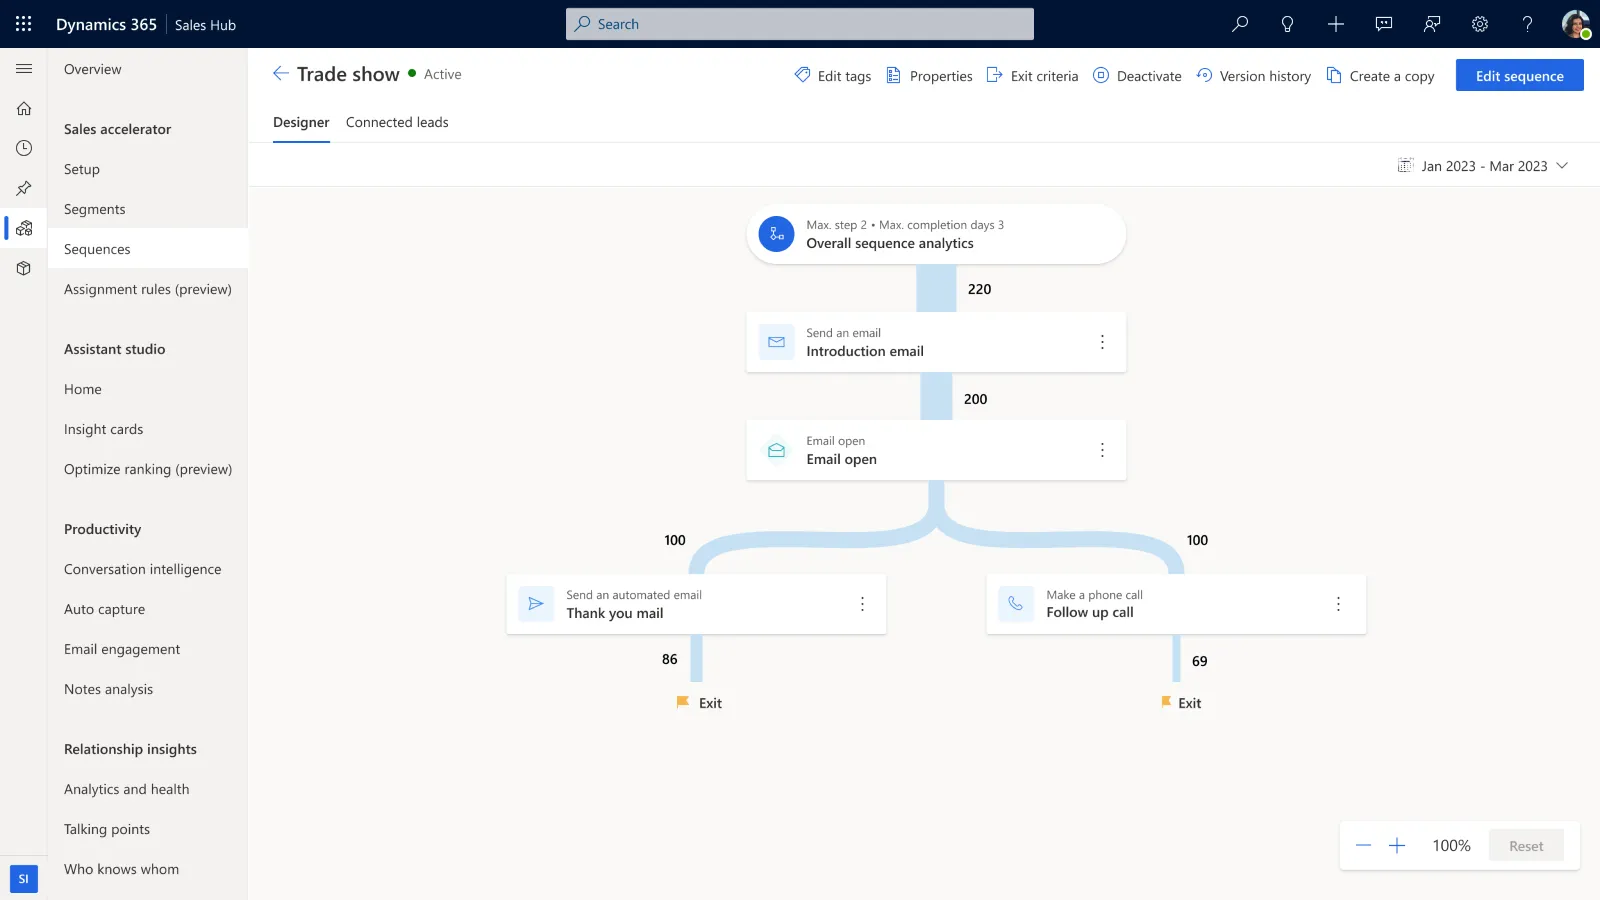
Sales leads are another type of record that can be accessed from a contact. These could be early stage enquiries and other unqualified prospects. For example, leads could be prospects from a trade show or people who’ve responded to a recent marketing campaign. Within a lead record, sellers can be guided by prompts in this “up next” area, which recommends the next action to progress a sales lead. Often sellers need to methodically follow a defined sequence of steps to qualify leads, so consistency is important to achieving successful outcomes. The precise steps and timings will vary depending on the type of lead, so in Dynamics you can configure a series of sales sequences to cover each repeatable scenario relevant to your business. In this example, the lead is connected with a nurturing sequence and the next step prompts the salesperson to send an email.
Below this immediate action, we can see the next steps in the sequence that would be triggered at the appropriate time, which include making a follow-up call and sending an additional message. Let’s follow the next sequence step by sending an email. Upon clicking the email button we stay on the lead record and we see this email overlay which has an editable message. The template was added when the sales sequence was configured to fit this specific scenario. This saves time by removing the need for individuals to find and select the correct template or type a message from scratch. Once the email is sent with any appropriate changes, the message is added to the lead timeline and this will also be accessible on the related contact record. The “up next” box is now updated to promote the next action in the sequence that will be triggered in a few days.
Managing dozens or more leads creates challenges in understanding which ones to prioritise. Using work lists, the Dynamics 365 sales accelerator helps to manage and prioritise actions on your active leads. Work lists are an evolution of the classic activity list which details the records that are assigned to you. Where action is needed today these tasks may have been created manually or automatically assigned through a sales sequence. Clicking an item will open the record enabling us to check the next best action. Once completed the entry is removed from today’s work list.
To prioritise leads and help achieve higher conversion rates Dynamics also provides predictive lead scores. Using historical data on the lead form we can review the positive and negative factors Dynamics has used to calculate this score. This reflects an analysis of data to identify factors which may contribute to a successful sales outcome and any detracting points. These scores drive lead ranking in the daily work list where the item at the top is the next best customer or prospect with the highest predictive score.
If you want to know more about work lists and sales sequences, we have a separate presentation that provides more detail. Also if you’re getting value from this video please do give it a like.
OK, so once we’re ready to qualify a lead it can be converted into a sales opportunity. By default, a single opportunity will be created but Dynamics can be configured to allow up to five opportunities from a single lead. We saw earlier how Copilot allows you to surface details about opportunities in Outlook and it also provides helpful insights within the Dynamics web interface. For this opportunity, the Copilot summary includes the forecasted value
and close date, and it’s also flagged a competitor risk. This information can be handy if you haven’t previously worked on a specific opportunity or maybe if you’re working on multiple deals and you want to see a recap or summary of any recent changes.
Like lead scoring, an opportunity score is also available. This uses a predictive machine learning model to score and grade each opportunity helping sellers prioritise their deals. The separate relationship health score provides a snapshot based on tracked emails, phone calls, tasks and other completed activities between the customer and the seller. Like any record in Dynamics 365, the opportunity layout and fields can be customised to reflect your selling process, rules and preferences. Sales sequences can also be used to progress opportunities prompting sellers to follow a series of steps to win each deal. In addition to appearing on the opportunity form, the next opportunity step will also display alongside leads in the sales accelerator work list that we saw earlier.
Winning deals is a team game so Dynamics integrates closely with Microsoft Teams to increase collaboration. Directly alongside sales records, your latest Teams chats are accessible, which is another example of how Dynamics minimises the time spent switching between apps by bringing these conversations into the CRM interface. From this window, we can start a new chat linked to the current CRM record. This allows us to contact other team members without navigating away from this opportunity. It also enables other team members to gain context about the opportunity and make contributions that will help us win the deal even if they aren’t Dynamics users. In Teams, this chat will appear as a separate conversation for each person involved. Alternatively, deal rooms provide customisable workspaces that can be created from Dynamics opportunities offering a structured collaboration area in Teams. These are designed for complex long-term deals which require extensive collaboration and document sharing that involves multiple stakeholders. Deal rooms have deep integration with Dynamics 365 enabling record sharing deal summaries and progress updates within Teams. This centralised approach enhances teamwork, streamlines communication and improves visibility for high value deals that require coordinated efforts across internal and external
parties.
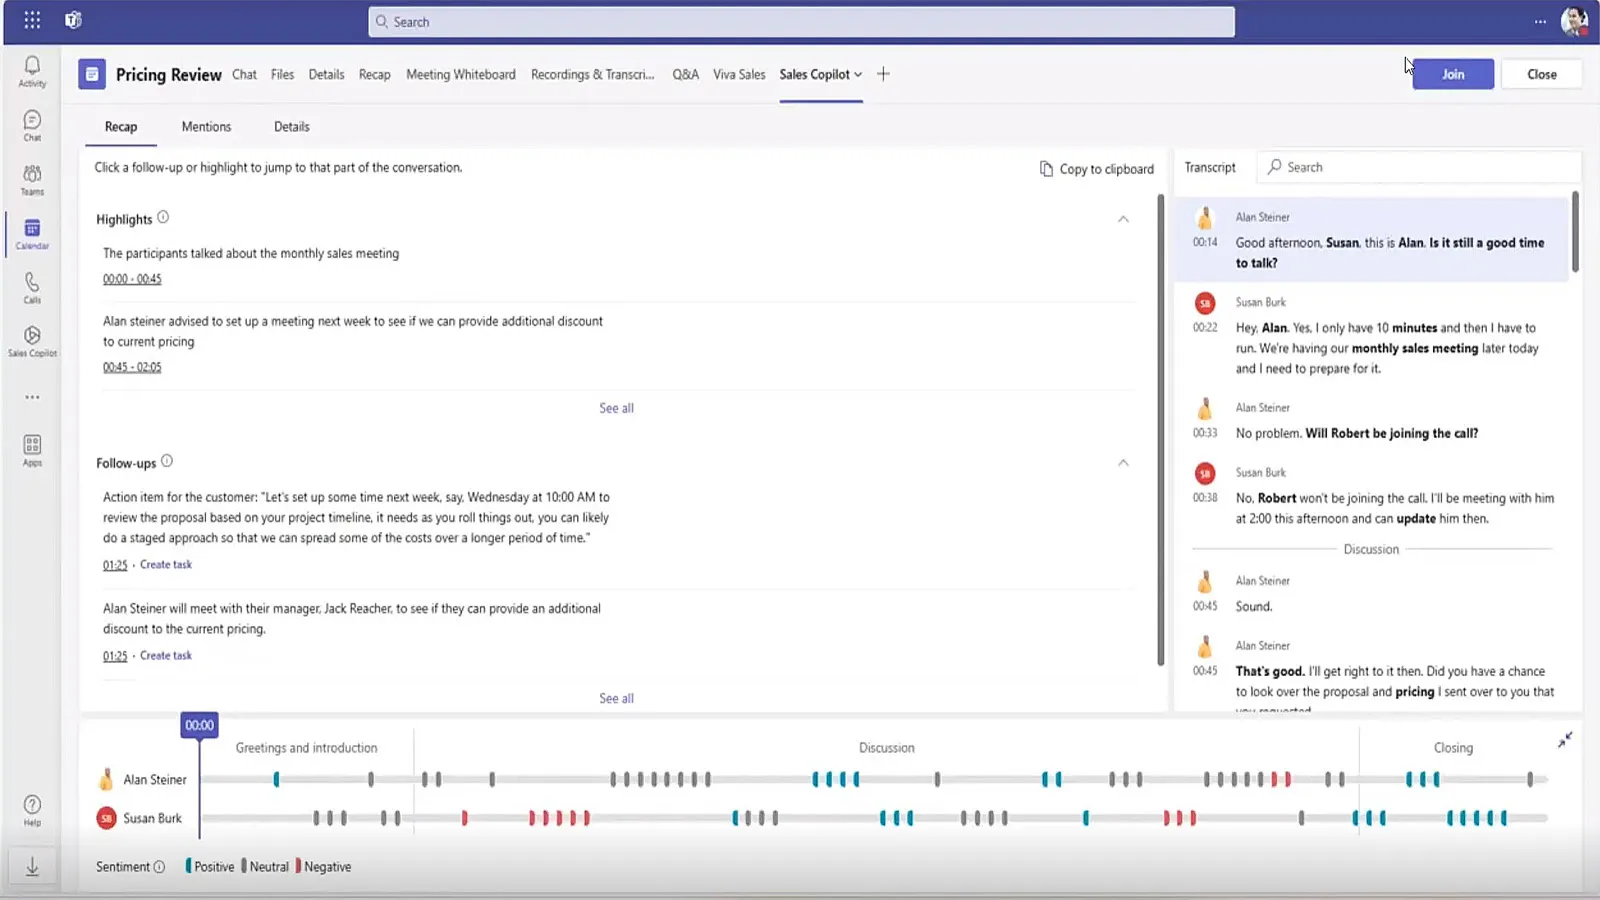
To progress this particular deal the next step is to schedule a Teams meeting with the customer, and that can be done within Dynamics. From the timeline we can quickly create an appointment and set this as a Teams meeting. The scheduled meetings can be launched directly from Dynamics 365 as an alternative to navigating a way to Outlook or Teams. During calls, sellers can view and update CRM records and capture notes that will be saved on the record. Dynamics conversation intelligence is also working in the background by automatically analysing and transcribing sales calls. After each call, the summary provides an overview with autogenerated highlights that can be added to the call summary. This will also suggest follow-up tasks and flag any predefined keywords mentioned during the conversation, such as products, competitors and people.
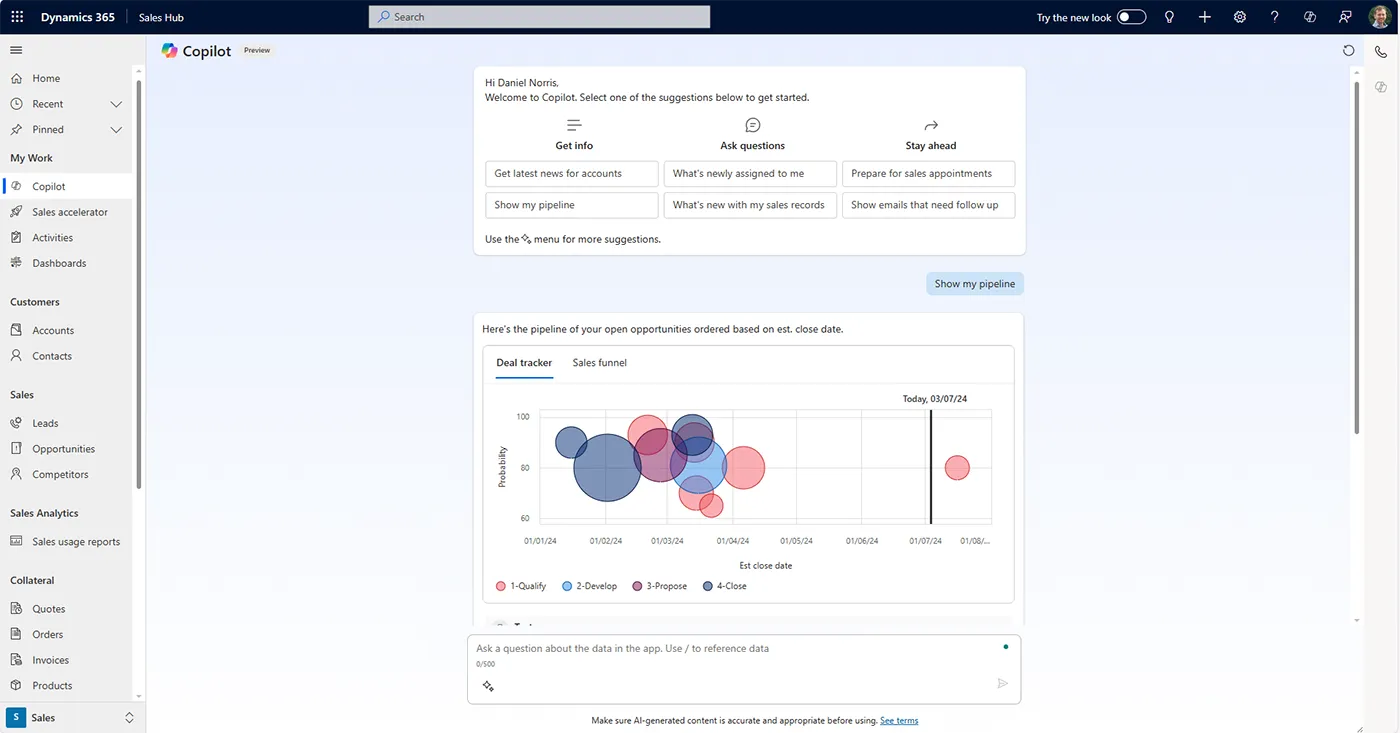
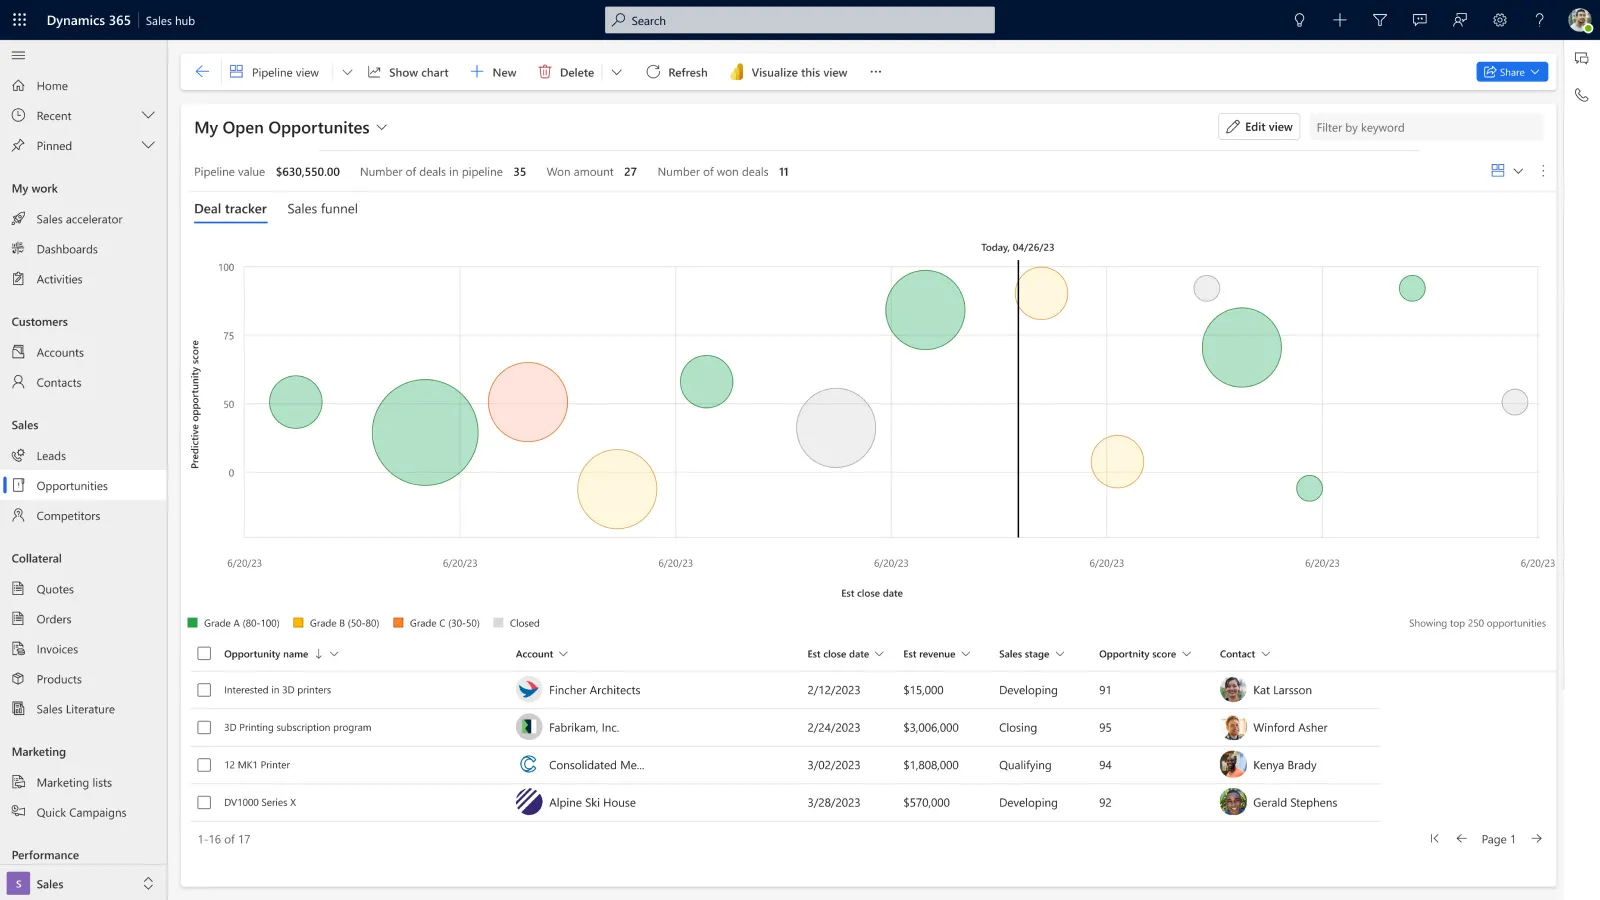
To interpret your data and get insights, Dynamics 365 Sales includes multiple pre-built dashboards covering leads, opportunities and other tables. For example, you can check your pipeline at a glance to visualise expected revenue at each pipeline stage, check your top open opportunities, see active leads and review your biggest value deals in the current year. This is just one example of a realtime ready-made sales dashboard, but others are available, and you can easily create your own bespoke sales dashboards, charts and lists.
From a grid list you can also use Power BI to generate a set of visuals in a single click. In a few seconds, this will automatically create a report using data from from the current grid. This makes it easier to explore your data using interactive charts and filters to drill down and uncover actionable insights.
To advance the opportunity we looked at earlier, a quote can now be issued. The price calculation for each quote and line item will depend on these product definitions including pricing rules, taxes and any discounts. Switching to the quote tab we’ll create a new quote that will prepopulate each line item. By pulling in these product details sellers can adjust pricing and other quote elements in the draft state, but depending on your own business rules some elements may be restricted to prevent unauthorised changes. Also, before a quote can be sent it might be subject to an approval process. For example, if the quote is above a certain value an automated process could be triggered in
Dynamics that will notify one or more people who need to check and authorise this before it can be sent.
Once the quote is confirmed, it can be activated. This can be exported as a PDF using your organisation’s branded quote template, and within the Dynamics interface it can be emailed as an attachment. Alternatively, ServerSys can integrate Dynamics with an electronic signing service such as DocuSign for seamless delivery and automatic capture of signed quotes, which can handle revisions and multiple signatures. Once the customer approves a quote it can be converted to an order record in Dynamics. From the order, you can create an invoice to bill a customer for this sale. Dynamics 365 can integrate with your ERP system, such as Business Central, so that order invoices are channeled through these applications and payment updates are synchronised back to CRM.
For B2B firms, accounts in Dynamics 365 track the various organisations you work with. Each account stores information about the associated contacts and other related records such as leads, opportunities and sales orders. This is a relational structure so a parent account sits at the top of the hierarchy providing a unified view of interactions across these related tables. Copilot again helps by providing an account summary which highlights the key points about this relationship, including flagging recent opportunities. From the suggested prompts, Copilot can help you understand any recent changes on the account, alternatively you can enter prompts such as asking Copilot to find recent news stories about the organisation that is surfaced by Bing. Earlier, you saw an example of a relationship health rating on an opportunity, and the relationship analytics tab provides a more comprehensive assessment on sales record forms, including accounts.
In this example, Dynamics uses email and meeting activity between our organisation and the customer to calculate performance indicators based on these tracked interactions. These out-of-the-box insights include the most contacted people per account, a comparison between interactions started by the customer and the seller and an analysis between the number of emails sent by either party. The relationship activities widget looks at activities over 60 days for this account, segmented by date and activity type, including emails sent or received, meeting invites sent and phone calls received. Some account relationships can be complex, involving multiple contacts spread across various teams.
To provide clarity org charts offer a visual hierarchy to identify key decision makers and influencers who may be involved in the organisation’s buying committee. Using drag and drop controls, related contacts can be moved into the chart or repositioned as needed. Another benefit of LinkedIn Sales Navigator integration means that profiles can be viewed from within the org chart, and this will also highlight if people have recently left the organisation.
You can access sales and relationship information using your mobile device while on the go. Tthis can be done using the Dynamics 365 sales app for iOS and Android devices or using your mobile browser. In this example, we’ve logged in using Power Apps which includes mobile offline working capabilities. Each of these options provides a comparable experience to using the desktop interface allowing users to make quick and easy updates. Using the menu we’ll navigate to our list of open opportunities. Now we’ll click through to the related account. The mobile experience can be customised as required. For example, this could vary the process to create records or provide mobile optimised controls to update fields.
Let’s now look at how Dynamics 365 supports sales leaders.
In addition to the team-based versions of the personal dashboards that we looked at earlier, this view offers a visual overview that provides clear visibility to show the status of a team’s overall pipeline. This opportunity pipeline view provides a snapshot of the volume of prospective deals, the estimated revenue, expected close dates and probability status. In the list below, we can aggregate opportunities by numerical value, for example, to calculate the average probability. Another calculation could be set for the total estimated revenue.
Columns can also be used to group opportunity rows, which applies filters to help you organise and navigate these records. For example, to focus on the opportunities expected to close in the short term, I’ll group the estimated close date by quarter which allows us to expand and collapse opportunities within these quarterly groups. To dig deeper, the Dynamics forecasting screen helps sales leaders assess how their team performs against its goals. This overview can be customised to display the relevant forecast detail including sales periods, territory groupings and currencies. The result is an on-demand projection of what a team or organisation is expected to achieve within a predefined period versus assigned sales targets or quotas.
Another example of how Dynamics data helps leaders gain insights into their top performers is by using conversation intelligence from Microsoft Teams calls. These pre-built reports highlight the characteristics of the most successful team members, including effective talk to listen ratios and which keywords gain traction during sales conversations. This also includes sentiment analysis from recorded calls that provides insight into sentiment.
Trends and a comparison between team members help identify coaching opportunities that will improve performance.
Sales usage reports are another helpful tool for managers to analyse team performance and monitor Dynamics 365 adoption. These embedded Power BI reports provide insights across sales performance indicators for the key entities we’ve looked at. This example of the opportunities usage tab includes an overview of how many opportunities have been created and updated, which team members converted the most opportunities, and a monthly status summary. Switching to the contact usage tab, these reports include a monthly analysis of actions performed on contacts and which users were most active.
Previously, we looked at how sales sequences help sellers save time and achieve consistent outcomes through a work list and guided actions. In this area, you can manage and create sequences to cover your repeatable sales scenarios. This could be a simple linear sequence of steps that sellers should follow to advance a lead which reflects your rules and methodology, but sequences are highly flexible and they can be designed to include automated steps that handle more complex processes, which reduce manual effort, for example, a sales sequence could include conditional rules and command steps to automatically update records and apply user assignment criteria. Within the flow of each sequence, other steps could include sending automated text messages and adding wait times.
With integrated Sales Navigator, you can weave social selling activities into these sequences that could include nudging sellers to complete research on a person by clicking through to their LinkedIn profile. There’s also a “get connected” step that will appear in the work list where sellers can make connection requests from within Dynamics or send inmail messages.
These are just some examples to demonstrate how Microsoft Dynamics 365 Sales provides an end-to-end solution that helps sales teams grow relationships and close more deals. At ServerSys, we will partner with you to implement Dynamics tailored to your unique sales process, providing ongoing consultancy and support to help you maximise its benefits. Please get in touch to discuss a solution for your business.
Helping Sellers Win by Working Smarter
Some sellers resist CRM systems, believing they create extra work. But Dynamics 365 Sales is different.
Productivity features including Copilot for Sales reduce manual data entry and minimise time spent switching between apps. You can also boost productivity by using the Copilot digital assistant to draft emails, add contacts, log activities and follow recommendations powered by your data.
Workflows and sales sequences are additional tools that save time by streamlining repetitive tasks. ServerSys will help you use these capabilities to increase productivity and accelerate sales.

Lead and Opportunity Management
Predictive Scoring
LinkedIn Sales Navigator Integration
Extendable with Power Automate
Dynamics 365 Sales Capabilities include:
Lead and Opportunity Management

Track, nurture, and convert leads into customers with a streamlined sales pipeline.
LinkedIn Sales Navigator Integration

Connect LinkedIn insights with Dynamics to strengthen relationships and close deals.
Interactive Dashboards and Reporting
Gain real-time sales insights with interactive dashboards and customisable reports.
Quotes, Orders and Invoicing Automation

Streamline quoting, ordering, and invoicing for faster sales processes.
Pipeline Management
Visualise and manage your sales pipeline for improved forecasting and deal tracking.
Sales Forecast Modeling

Predict future sales with model forecasting and trend analysis.
Boost Productivity with AI Assistance

Automate tasks and get intelligent recommendations to close deals faster with Copilot.
Microsoft Teams and Outlook Integration
Collaborate and manage customer interactions directly from Teams and Outlook.
Download Dynamics 365 Sales Guide
Discover more about Dynamics 365 Sales and how ServerSys can help boost your sales team’s productivity.

We are proud to work with...


Customer Quote
Dynamics 365 Sales: Frequently Asked Questions
Ready to talk?
Want to strengthen your relationships, boost sales productivity, and accelerate growth?
Speak to our experts to explore how Dynamics 365 Sales can benefit your business. Call us now on 0203 884 3804, email hello@serversys.com, or complete the contact form below.