Insights and News
Learn what’s new and read our insights about Microsoft Dynamics 365 and the Power Platform.
External AI in Your Dynamics: Innovation Opportunity or Security Risk?
Discover the benefits and risks of using external AI tools with Dynamics 365 and key policies for secure CRM AI integration

Don’t Hit Send Until Using This Dynamics 365 Customer Insights Checklist
Avoid costly email mistakes with this essential pre-send campaign checklist for Dynamics 365 Customer Insights – Journeys.
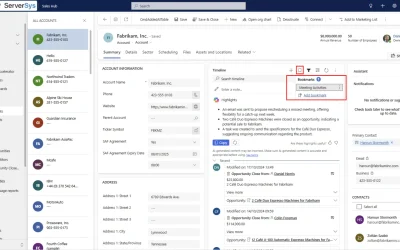
How This Overlooked Dynamics Feature Can Help You Navigate Timelines
Discover how Dynamics 365 timeline bookmarks can save your team hours daily. Transform repetitive filtering into single-click efficiency.

How Intelligent Web Portals Redefine Business Success
Announcing our latest guide exploring how intelligent web portals enhance agility and meet customer needs by reimagining digital interactions

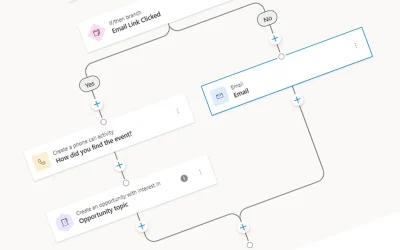
Beyond Bulk Emails: How Dynamics 365 Customer Insights Triggers Transform Marketing Engagement
Move beyond bulk emails. Discover trigger-based marketing with Dynamics 365 for relevant, timely communications that drive results.

AI in Action: Insights from Microsoft’s Work Trends Index 2025
Discover highlights from Microsoft’s 2025 Work Trend Index, including how AI and agents increase scale and boost meaningful work outcomes.

How AI Agents for Membership Organisations Boost Efficiency and Engagement
Discover how AI agents empower membership organisations to enhance operational agility, deliver smarter processes, and support member growth.

Refine Segments with Marketing Signals in Customer Insights – Data
Discover how new segmentation features in Customer Insights – Data let you target audiences using marketing engagement signals.

Faster, Smarter, and Clearer: How Copilot Content Assist Improves Customer Service Emails
Boost customer service efficiency with Copilot Content Assist for drafting for faster, clearer, and more accurate responses.
External AI in Your Dynamics: Innovation Opportunity or Security Risk?
Discover the benefits and risks of using external AI tools with Dynamics 365 and key policies for secure CRM AI integration
Don’t Hit Send Until Using This Dynamics 365 Customer Insights Checklist
Avoid costly email mistakes with this essential pre-send campaign checklist for Dynamics 365 Customer Insights – Journeys.

Drive Growth with Agentic AI: Key Insights from Microsoft’s Agents of Change Report 2025
Findings from Microsoft’s Agents of Change report reveal how agentic AI is driving growth and transforming productivity for UK businesses.

Microsoft UK Pricing Decreases and Increases: How to Save on Your Licence Costs in 2025
Learn how Microsoft UK pricing changes could impact your license costs and discover ways to save before April 2025.

Navigating AI Adoption: Strategies for Success
Discover strategies for successful AI adoption. Enhance operations and stay agile with practical, innovative solutions.

How Agile Dynamics 365 Projects Accelerate ROI
Accelerate your Dynamics 365 ROI with Agile project management. Explore ServerSys approach to flexible, efficient CRM implementation.

15 Ideas to Improve Your Dynamics 365 in 2025
Discover 25 practical ideas to improve your Dynamics 365 in 2025. Boost efficiency, enhance data quality, and use AI for business growth

5 Events You Can Organise In Dynamics 365 Customer Insights
Learn how Dynamics 365 Customer Insights Events planner can streamline event management for Trade Shows, Webinars, Conferences and Workshops.

Best Practices for Managing Client Secrets in Dynamics 365
Secure your Dynamics 365 integrations with practical client secret management. Explore 5 strategies to enhance security and continuity.
External AI in Your Dynamics: Innovation Opportunity or Security Risk?
Discover the benefits and risks of using external AI tools with Dynamics 365 and key policies for secure CRM AI integration
How This Overlooked Dynamics Feature Can Help You Navigate Timelines
Discover how Dynamics 365 timeline bookmarks can save your team hours daily. Transform repetitive filtering into single-click efficiency.
Beyond Bulk Emails: How Dynamics 365 Customer Insights Triggers Transform Marketing Engagement
Move beyond bulk emails. Discover trigger-based marketing with Dynamics 365 for relevant, timely communications that drive results.
Refine Segments with Marketing Signals in Customer Insights – Data
Discover how new segmentation features in Customer Insights – Data let you target audiences using marketing engagement signals.
Faster, Smarter, and Clearer: How Copilot Content Assist Improves Customer Service Emails
Boost customer service efficiency with Copilot Content Assist for drafting for faster, clearer, and more accurate responses.
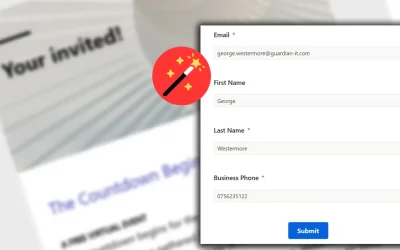
Simplify Event Registration in Customer Insights with Form Prefill
Make customer journeys smoother with Dynamics 365’s new form prefill feature – save time, reduce friction, and boost form completion rates.

Copilot Chart Visuals for Dynamics 365 Views
Discover automated chart visuals for Dynamics 365 views, enabling efficient data interpretation with AI-powered Copilot insights.
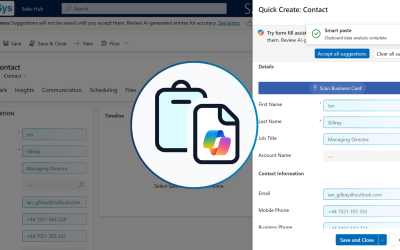
Accelerate Dynamics 365 Record Creation with Smart Paste Form Fill
Boost productivity in Dynamics 365 with Copilot’s Smart Paste. Simplify data entry, save time, and enhance accuracy. See how it works.
Align Sales and Marketing with D365 Handover Automation
Align sales and marketing with Dynamics 365 Handover Automation for seamless lead transitions and improved conversions.
External AI in Your Dynamics: Innovation Opportunity or Security Risk?
Discover the benefits and risks of using external AI tools with Dynamics 365 and key policies for secure CRM AI integration
Refine Segments with Marketing Signals in Customer Insights – Data
Discover how new segmentation features in Customer Insights – Data let you target audiences using marketing engagement signals.
Faster, Smarter, and Clearer: How Copilot Content Assist Improves Customer Service Emails
Boost customer service efficiency with Copilot Content Assist for drafting for faster, clearer, and more accurate responses.
Simplify Event Registration in Customer Insights with Form Prefill
Make customer journeys smoother with Dynamics 365’s new form prefill feature – save time, reduce friction, and boost form completion rates.
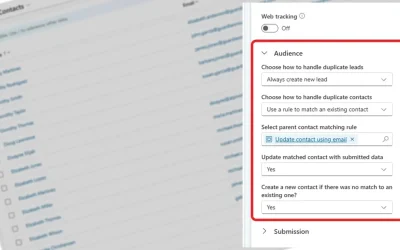
New Form Audience Management Options in D365 Customer Insights
Optimise your lead and contact management with real-time journey forms in Microsoft Dynamics 365 Customer Insights.
Copilot Chart Visuals for Dynamics 365 Views
Discover automated chart visuals for Dynamics 365 views, enabling efficient data interpretation with AI-powered Copilot insights.
Accelerate Dynamics 365 Record Creation with Smart Paste Form Fill
Boost productivity in Dynamics 365 with Copilot’s Smart Paste. Simplify data entry, save time, and enhance accuracy. See how it works.
Microsoft UK Pricing Decreases and Increases: How to Save on Your Licence Costs in 2025
Learn how Microsoft UK pricing changes could impact your license costs and discover ways to save before April 2025.
Align Sales and Marketing with D365 Handover Automation
Align sales and marketing with Dynamics 365 Handover Automation for seamless lead transitions and improved conversions.
How Intelligent Web Portals Redefine Business Success
Announcing our latest guide exploring how intelligent web portals enhance agility and meet customer needs by reimagining digital interactions

Simplify Compliance Management with Integrated Web Portals
Simplify your compliance processes with integrated web portals. Discover how to streamline tasks, reduce errors, and ensure consistency.

What’s New for Power Pages in 2025
Explore innovative AI features for Power Pages websites in 2025. See how smart summaries and agents will improve portals.

A Quick Guide to Power Pages Website Templates
Discover examples of Power Pages templates to simplify site development and enhance efficiency with integrated, data-powered websites.

What’s New in Microsoft Power Pages for 2024
Discover the latest Power Pages 2024 enhancements – empowering seamless, data-rich website creation and management.

How Microsoft Copilot Transforms Knowledge Search in Web Portals
Learn how Copilot Studio enhances search with accurate, contextual query responses.
A Quick Guide to Licensing Dynamics 365 Customer Insights
Get a clear overview of D365 Customer Insights licensing. Explore tenant-based licenses, default capacities, and fair usage policies.
Microsoft UK Pricing Decreases and Increases: How to Save on Your Licence Costs in 2025
Learn how Microsoft UK pricing changes could impact your license costs and discover ways to save before April 2025.

How to Prepare for the Microsoft Dynamics 365 Price Increase on 1st October
Steps to prepare for the Dynamics 365 licence price rise and minimise impact.

Essentials of Microsoft Power Pages Licensing
Explore the key licensing information for Microsoft Power Pages, including use rights, capacity meters and pricing.

Comparing Microsoft Dynamics 365 Sales Licences
Understand the key differences between Dynamics 365 Sales licenses, including functionalities, storage and entitlements for cost-effective decisions.

Dynamics 365 Pricing Increase from October 2024
Detailing pricing changes across Dynamics 365 products from October 2024, including Sales Enterprise and Customer Service Enterprise.

How to Licence Microsoft Dynamics 365 Customer Service
Are you overpaying for Dynamics 365 Customer Service licenses? Learn more about the options here.

15 Ideas to Level Up Your Dynamics 365 CRM
Elevate your Dynamics 365 CRM system with these user-focused enhancements, data management best practices and features.

How is Microsoft Copilot for Sales Licensed?
Dive into the licensing details of Copilot for Sales. Optimise seller productivity, integrating Microsoft 365 with CRM and seller workflows.
Accelerate Dynamics 365 Record Creation with Smart Paste Form Fill
Boost productivity in Dynamics 365 with Copilot’s Smart Paste. Simplify data entry, save time, and enhance accuracy. See how it works.

Previewing 2025 Release Wave 1 for Dynamics 365 and Power Platform
Highlights of the 2025 Release Wave 1 for Power Platform, Dynamics 365 Sales, D365 Customer Service and Customer Insights – Journeys

New Dataverse Recycle Bin to Restore Deleted Records
Accidentally deleting one or more Dynamics 365 records is a dreaded experience. Deleting an account is particularly harmful because it triggers...

Recorded Webinar: Driving Your Data Driven Culture with Power BI
Discover how to increase the value of your data with Power BI visuals that drive confident decisions.
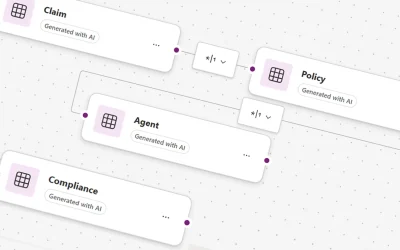
Generate Your Dataverse Tables Faster With Copilot
Effortlessly create tables in Dataverse with Copilot. Save time, automate relationships, and streamline data management for your applications
How AI Agents and Copilot Studio Redefine Automation
If you are familiar with Microsoft Copilot, you’ll know its ability to draft emails and search for information. Copilot agents offer extra...

Hierarchy Controls Deprecated in Dynamics 365 and Power Platform
Hierarchy controls in Dynamics 365 and Power Platform are deprecated. Learn about timelines, temporary fixes, and modern alternatives.
Customising Option Set Colours in Grid Controls
How to add or remove colours from grid columns in Dynamics 365 and model-driven apps representing option set values.

Forrester Study Finds Power Apps Delivers 206% ROI
Forrester’s study reveals compelling findings about Power Apps. Read the highlights on efficiency, cost savings, and business impact.
External AI in Your Dynamics: Innovation Opportunity or Security Risk?
Discover the benefits and risks of using external AI tools with Dynamics 365 and key policies for secure CRM AI integration
AI in Action: Insights from Microsoft’s Work Trends Index 2025
Discover highlights from Microsoft’s 2025 Work Trend Index, including how AI and agents increase scale and boost meaningful work outcomes.
How AI Agents for Membership Organisations Boost Efficiency and Engagement
Discover how AI agents empower membership organisations to enhance operational agility, deliver smarter processes, and support member growth.
Faster, Smarter, and Clearer: How Copilot Content Assist Improves Customer Service Emails
Boost customer service efficiency with Copilot Content Assist for drafting for faster, clearer, and more accurate responses.
Drive Growth with Agentic AI: Key Insights from Microsoft’s Agents of Change Report 2025
Findings from Microsoft’s Agents of Change report reveal how agentic AI is driving growth and transforming productivity for UK businesses.
Accelerate Dynamics 365 Record Creation with Smart Paste Form Fill
Boost productivity in Dynamics 365 with Copilot’s Smart Paste. Simplify data entry, save time, and enhance accuracy. See how it works.
Navigating AI Adoption: Strategies for Success
Discover strategies for successful AI adoption. Enhance operations and stay agile with practical, innovative solutions.

Update your D365 Customer Service Knowledge Base with Copilot
Discover how to efficiently update your knowledge base using Dynamics 365’s Customer Knowledge Management Agent.
15 Ideas to Improve Your Dynamics 365 in 2025
Discover 25 practical ideas to improve your Dynamics 365 in 2025. Boost efficiency, enhance data quality, and use AI for business growth
Faster, Smarter, and Clearer: How Copilot Content Assist Improves Customer Service Emails
Boost customer service efficiency with Copilot Content Assist for drafting for faster, clearer, and more accurate responses.
Simplify Event Registration in Customer Insights with Form Prefill
Make customer journeys smoother with Dynamics 365’s new form prefill feature – save time, reduce friction, and boost form completion rates.
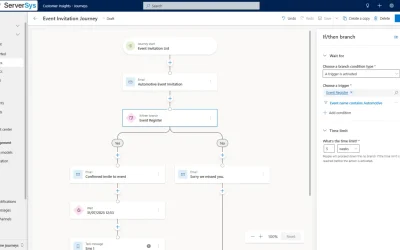
Managing Consent and Compliance Profiles in Dynamics 365 Real-Time Journeys
Configure consent and compliance profiles in Dynamics 365 to ensure GDPR compliance and respect your customer preferences.
New Form Audience Management Options in D365 Customer Insights
Optimise your lead and contact management with real-time journey forms in Microsoft Dynamics 365 Customer Insights.

5 Ways to Improve Marketing Campaigns with Customer Insights – Data
Boost your marketing with Customer Insights: Data – unify, enrich, and export customer data for smarter targeting and higher campaign ROI.
How Agile Dynamics 365 Projects Accelerate ROI
Accelerate your Dynamics 365 ROI with Agile project management. Explore ServerSys approach to flexible, efficient CRM implementation.

12 Ways to Modernise Sales and Drive Growth with D365 Sales
Discover 12 powerful D365 Sales features to modernise your sales process, boost productivity, and drive sustainable growth.
Update your D365 Customer Service Knowledge Base with Copilot
Discover how to efficiently update your knowledge base using Dynamics 365’s Customer Knowledge Management Agent.
15 Ideas to Improve Your Dynamics 365 in 2025
Discover 25 practical ideas to improve your Dynamics 365 in 2025. Boost efficiency, enhance data quality, and use AI for business growth
How Intelligent Web Portals Redefine Business Success
Announcing our latest guide exploring how intelligent web portals enhance agility and meet customer needs by reimagining digital interactions
Beyond Bulk Emails: How Dynamics 365 Customer Insights Triggers Transform Marketing Engagement
Move beyond bulk emails. Discover trigger-based marketing with Dynamics 365 for relevant, timely communications that drive results.
AI in Action: Insights from Microsoft’s Work Trends Index 2025
Discover highlights from Microsoft’s 2025 Work Trend Index, including how AI and agents increase scale and boost meaningful work outcomes.
How AI Agents for Membership Organisations Boost Efficiency and Engagement
Discover how AI agents empower membership organisations to enhance operational agility, deliver smarter processes, and support member growth.
Drive Growth with Agentic AI: Key Insights from Microsoft’s Agents of Change Report 2025
Findings from Microsoft’s Agents of Change report reveal how agentic AI is driving growth and transforming productivity for UK businesses.
How AI Agents and Copilot Studio Redefine Automation
If you are familiar with Microsoft Copilot, you’ll know its ability to draft emails and search for information. Copilot agents offer extra...
Forrester Study Finds Power Apps Delivers 206% ROI
Forrester’s study reveals compelling findings about Power Apps. Read the highlights on efficiency, cost savings, and business impact.

Innovate Faster with AI and Low-Code Solutions
Accelerate innovation with the Microsoft Power Platform. Learn how AI and low-code tools transform business operations and boost efficiency.

From Ideas to Solutions: How Power Apps Accelerates and Simplifies Development
Discover how Power Apps can streamline app development and enhance business operations.

How Hill Dickinson Advanced Its Digital Transformation with ServerSys
Explore Hill Dickinson’s digital leap forward with ServerSys,harnessing Dynamics 365 for seamless client engagement and innovation.

How to Ensure Dynamics 365 CRM Go-Live Success
Navigate your Dynamics 365 CRM project with ease. Our guide provides a detailed roadmap for efficient project ‘go-live’, leading your business towards growth and innovation.
How Intelligent Web Portals Redefine Business Success
Announcing our latest guide exploring how intelligent web portals enhance agility and meet customer needs by reimagining digital interactions
Simplify Compliance Management with Integrated Web Portals
Simplify your compliance processes with integrated web portals. Discover how to streamline tasks, reduce errors, and ensure consistency.
What’s New for Power Pages in 2025
Explore innovative AI features for Power Pages websites in 2025. See how smart summaries and agents will improve portals.
A Quick Guide to Power Pages Website Templates
Discover examples of Power Pages templates to simplify site development and enhance efficiency with integrated, data-powered websites.
What’s New in Microsoft Power Pages for 2024
Discover the latest Power Pages 2024 enhancements – empowering seamless, data-rich website creation and management.
How Microsoft Copilot Transforms Knowledge Search in Web Portals
Learn how Copilot Studio enhances search with accurate, contextual query responses.
External AI in Your Dynamics: Innovation Opportunity or Security Risk?
Discover the benefits and risks of using external AI tools with Dynamics 365 and key policies for secure CRM AI integration
Managing Consent and Compliance Profiles in Dynamics 365 Real-Time Journeys
Configure consent and compliance profiles in Dynamics 365 to ensure GDPR compliance and respect your customer preferences.
Best Practices for Managing Client Secrets in Dynamics 365
Secure your Dynamics 365 integrations with practical client secret management. Explore 5 strategies to enhance security and continuity.

Is Your Dynamics 365 Audit Policy Aligned with Your Business Needs?
Are your Dynamics 365 audit settings up to date? Avoid compliance gaps and security risks.

Ask the Consultant – Insights for Building Dynamics 365 Solutions
Insights on best practices, customisation, and deployment of Microsoft Dynamics 365 and Power Platform from our experienced consultants.

5 Best Practices to Reinforce Security in Dynamics 365 & Power Apps
Elevate security in your Dynamics and Power Apps environments with these 5 best practices for data protection.

New Security Roles Interface for Dynamics 365 Administrators
Discover how the latest enhancements to Dynamics 365’s security roles interface transform administration efficiency and data integrity.
15 Ideas to Level Up Your Dynamics 365 CRM
Elevate your Dynamics 365 CRM system with these user-focused enhancements, data management best practices and features.

Mastering Access Control with Dynamics 365 Security Roles
Discover how Dynamics 365 security roles help administrators simplify user access management and ensure appropriate usage privileges.
New Dataverse Recycle Bin to Restore Deleted Records
Accidentally deleting one or more Dynamics 365 records is a dreaded experience. Deleting an account is particularly harmful because it triggers...
Is Your Dynamics 365 Audit Policy Aligned with Your Business Needs?
Are your Dynamics 365 audit settings up to date? Avoid compliance gaps and security risks.

Behind the Scenes: How our Support Team Powers Customer Success with Dynamics 365
Discover how our dedicated support ensures smooth operations in Dynamics 365.

How to Add Document Metadata to Attached Files in Dynamics 365
Improve Dynamics 365 file management with a solution that adds metadata, enhances document organisation and saves time.
Reviewing Copilot Transcripts Retention to Free Up Your Dataverse Storage Capacity
Learn to optimise your Dataverse storage by efficiently managing Copilot transcripts from Dynamics 365 and Power Apps.
15 Ideas to Level Up Your Dynamics 365 CRM
Elevate your Dynamics 365 CRM system with these user-focused enhancements, data management best practices and features.

Reduce Your Dynamics 365 Storage Costs with Azure Blob Storage
Cut Dynamics 365 storage costs significantly with Azure Blob Storage. Smart, secure, and cost-effective data archiving for your business

Demystifying the Microsoft Dataverse Storage Model
Optimise your Microsoft Dataverse storage with insights on database, file, and log capacities, utilisation notifications and add-ons.

How to Cut Dynamics 365 Storage Costs with Dataverse Retention Policies
New Dataverse policies help cut Dynamics 365 storage costs and meet compliance by automatically archiving old records.
AI in Action: Insights from Microsoft’s Work Trends Index 2025
Discover highlights from Microsoft’s 2025 Work Trend Index, including how AI and agents increase scale and boost meaningful work outcomes.
Faster, Smarter, and Clearer: How Copilot Content Assist Improves Customer Service Emails
Boost customer service efficiency with Copilot Content Assist for drafting for faster, clearer, and more accurate responses.
Copilot Chart Visuals for Dynamics 365 Views
Discover automated chart visuals for Dynamics 365 views, enabling efficient data interpretation with AI-powered Copilot insights.
Accelerate Dynamics 365 Record Creation with Smart Paste Form Fill
Boost productivity in Dynamics 365 with Copilot’s Smart Paste. Simplify data entry, save time, and enhance accuracy. See how it works.
Navigating AI Adoption: Strategies for Success
Discover strategies for successful AI adoption. Enhance operations and stay agile with practical, innovative solutions.
Update your D365 Customer Service Knowledge Base with Copilot
Discover how to efficiently update your knowledge base using Dynamics 365’s Customer Knowledge Management Agent.
Generate Your Dataverse Tables Faster With Copilot
Effortlessly create tables in Dataverse with Copilot. Save time, automate relationships, and streamline data management for your applications
What’s New for Power Pages in 2025
Explore innovative AI features for Power Pages websites in 2025. See how smart summaries and agents will improve portals.
How AI Agents and Copilot Studio Redefine Automation
If you are familiar with Microsoft Copilot, you’ll know its ability to draft emails and search for information. Copilot agents offer extra...
External AI in Your Dynamics: Innovation Opportunity or Security Risk?
Discover the benefits and risks of using external AI tools with Dynamics 365 and key policies for secure CRM AI integration
Accelerate Dynamics 365 Record Creation with Smart Paste Form Fill
Boost productivity in Dynamics 365 with Copilot’s Smart Paste. Simplify data entry, save time, and enhance accuracy. See how it works.
Microsoft UK Pricing Decreases and Increases: How to Save on Your Licence Costs in 2025
Learn how Microsoft UK pricing changes could impact your license costs and discover ways to save before April 2025.
Align Sales and Marketing with D365 Handover Automation
Align sales and marketing with Dynamics 365 Handover Automation for seamless lead transitions and improved conversions.
Previewing 2025 Release Wave 1 for Dynamics 365 and Power Platform
Highlights of the 2025 Release Wave 1 for Power Platform, Dynamics 365 Sales, D365 Customer Service and Customer Insights – Journeys
12 Ways to Modernise Sales and Drive Growth with D365 Sales
Discover 12 powerful D365 Sales features to modernise your sales process, boost productivity, and drive sustainable growth.
Integrate Companies House SIC Codes with Dynamics 365
Simplify SIC code management in Dynamics 365. Our integration improves data accuracy, saves time, and enhances business insights.

How Dynamics 365 Solves These 6 Sales Challenges
Find out how Dynamics 365 Sales tackles 6 common challenges head-on, such as boosting forecasting, shortening cycles and improving conversions.

Using Dynamics 365 Sales to Track Your Competitors
Explore how to improve sales performance using Dynamics 365 competitor tracking to track deals and improve win rates with data-driven decisions.
Faster, Smarter, and Clearer: How Copilot Content Assist Improves Customer Service Emails
Boost customer service efficiency with Copilot Content Assist for drafting for faster, clearer, and more accurate responses.
Accelerate Dynamics 365 Record Creation with Smart Paste Form Fill
Boost productivity in Dynamics 365 with Copilot’s Smart Paste. Simplify data entry, save time, and enhance accuracy. See how it works.
Microsoft UK Pricing Decreases and Increases: How to Save on Your Licence Costs in 2025
Learn how Microsoft UK pricing changes could impact your license costs and discover ways to save before April 2025.
Previewing 2025 Release Wave 1 for Dynamics 365 and Power Platform
Highlights of the 2025 Release Wave 1 for Power Platform, Dynamics 365 Sales, D365 Customer Service and Customer Insights – Journeys
Update your D365 Customer Service Knowledge Base with Copilot
Discover how to efficiently update your knowledge base using Dynamics 365’s Customer Knowledge Management Agent.

2024 Release Wave 2 Plans for Dynamics 365 CRM, Copilot & Power Platform: Top 32 Announcements
Summarising the top announcements from the 2024 Release Wave 2 Plans.

A Concise Guide to Dynamics 365 Agent Scripts
Discover how to enhance customer support with Dynamics 365 agent scripts for efficient, consistent service and brand unity.

Ultimate Dynamics 365 Terminology Cheat Sheet
Learn essential Dynamics 365 terminology like entity, record, Dataverse, and workflows. Perfect for newcomers to navigate the platform.
Dynamics 365 Pricing Increase from October 2024
Detailing pricing changes across Dynamics 365 products from October 2024, including Sales Enterprise and Customer Service Enterprise.
Don’t Hit Send Until Using This Dynamics 365 Customer Insights Checklist
Avoid costly email mistakes with this essential pre-send campaign checklist for Dynamics 365 Customer Insights – Journeys.
Beyond Bulk Emails: How Dynamics 365 Customer Insights Triggers Transform Marketing Engagement
Move beyond bulk emails. Discover trigger-based marketing with Dynamics 365 for relevant, timely communications that drive results.
Refine Segments with Marketing Signals in Customer Insights – Data
Discover how new segmentation features in Customer Insights – Data let you target audiences using marketing engagement signals.
Simplify Event Registration in Customer Insights with Form Prefill
Make customer journeys smoother with Dynamics 365’s new form prefill feature – save time, reduce friction, and boost form completion rates.
Managing Consent and Compliance Profiles in Dynamics 365 Real-Time Journeys
Configure consent and compliance profiles in Dynamics 365 to ensure GDPR compliance and respect your customer preferences.

Calculating the ROI of Microsoft Dynamics 365 Customer Insights
Explore examples of the ROI gained by marketing teams from implementing D365 Customer Insights with Forrester research findings.
New Form Audience Management Options in D365 Customer Insights
Optimise your lead and contact management with real-time journey forms in Microsoft Dynamics 365 Customer Insights.
A Quick Guide to Licensing Dynamics 365 Customer Insights
Get a clear overview of D365 Customer Insights licensing. Explore tenant-based licenses, default capacities, and fair usage policies.
5 Ways to Improve Marketing Campaigns with Customer Insights – Data
Boost your marketing with Customer Insights: Data – unify, enrich, and export customer data for smarter targeting and higher campaign ROI.